Oregon State University OREGON STATE UNIVERSITY Open search box

CoSINe IT Services, Division of Arts and Sciences

Toggle menu Go to search page
    • Home
    • Request Help
    • FAQ
      • Accounts & Passwords
      • After I Change My ONID Password
      • Printing
      • Cordley 3003 Computer Lab
      • Data Backup & Restore
      • Data Storage & Access
      • Email Configuration & Setup
      • New Faculty, Staff and Graduate Students
      • Purchasing
      • Reconfiguring Wi-Fi After an ONID Password Change
      • Settling into CoSINe's Webmail Server
      • Software Tools & Fixes
      • Unix HPC Cluster
      • VPN
      • Web Cluster
      • Web Services
      • Windows
      • Wireless
    • Remote Support
    • Calendar
    • Library
    • Maps
    • Online Services
    • Directory
    • Make a Gift
  • Home
  • Request Help
  • FAQ
    • Accounts & Passwords
    • After I Change My ONID Password
    • Printing
    • Cordley 3003 Computer Lab
    • Data Backup & Restore
    • Data Storage & Access
    • Email Configuration & Setup
    • New Faculty, Staff and Graduate Students
    • Purchasing
    • Reconfiguring Wi-Fi After an ONID Password Change
    • Settling into CoSINe's Webmail Server
    • Software Tools & Fixes
    • Unix HPC Cluster
    • VPN
    • Web Cluster
    • Web Services
    • Windows
    • Wireless
  • Remote Support

You are here

Home

Frequently Asked Questions

Accounts & Passwords

Account Types

In general, we create two accounts for each user: an Unix account and a windows domain account. Each type of account can have an email mailbox added. The default is to create a Unix IMAP mailbox unless Exchange is specifically requested.

UNIX Account:
- Personal Home Directory (Z:\ Drive)
- SSH, SFTP Access
- Personal Web Site (must create public_html folder)
- IMAP mailbox
-- Email Address: username@science.oregonstate.edu
-- Email Alias: First.Last@science.oregonstate.edu

Windows Account:

- SCIENCE Domain Login
- Access to Departmental Storage Share (T:\Microbiology)
- Optional Exchange mailbox
-- Email Address: First.Last@oregonstate.edu
* If Exchange email is requested, we typically do not create an IMAP email mailbox. In such
cases, we create a forward for username@science.oregonstate.edu to the Exchange email
address (First.Last@oregonstate.edu).

Global Address List (Outlook Address Book):
- Exchange mailbox users
- Staff
- Faculty
* Exchange users automatically get added to the Global Address List (this can be hidden upon
request). Additionally, for non-Exchange users we publish to the GAL the Unix email address
for staff and faculty. Since mid-2009, the GAL publishing process automatically adds an
email alias First.Last@oregonstate.edu. We can retroactively add an email alias of
First.Last@oregonstate.edu for staff and faculty that do not have one.

Exchange Fees and Quota:

- Standard Mailbox
-- $2/monthly - 1000 MB
-- $2/monthly per each additional 500 MB (allocation increases must be requested)
- Limited Use Mailbox
-- Free - 100 MB

Account Request:
- http://cosine.oregonstate.edu/files/cosine/pdfs/accountrequest.pdf

Password Changes:
- https://secure.science.oregonstate.edu
* The password change tool sets the password on both an user's Unix and windows accounts.

Tips for Choosing a Secure Password

Passwords must have a minimum of 8 characters and must include at least 1 of each of the following:

  • upper case letter(s)
  • lowercase letter(s)
  • numerals and/or non-alphanumeric characters (e.g. +,&,%,#,/,<, etc.)

Password should never include the user or login name (or variation of)

"But I can't remember a non-sense password," you say. Use a song or phrase that you can easily remember, for example "Mary had a little lamb, whose fleece was white as snow". Using the first letter of each word, and selectively replacing some letters with similarly shaped numbers, you could have a secure and memorable password like : Mhall,wfwwa5.

Do not use that example, since it is listed here and publicly available.

I Forgot My Email/ Domain Password

If you have forgotten your account password, it must be reset by the Cosine Helpdesk. Due to security/privacy concerns, users must come to the Cosine Helpdesk in person with an official photo ID (e.g. OSU ID card, drivers license, etc.).

Changing your Password

Using a web browser that supports secure connections go to: http://secure.science.oregonstate.edu

Log in using your science username and password (you do not need put in science\ before your username)

Usermin Login

Click on "Change Password"

Change Password link

Enter in your current password and your new password twice. Click Change Now.

Please read the guidelines for choosing a good password here.

 password box

 You have changed your Science account password.

How Long is my Account Active After Leaving OSU

When you leave OSU, unless Cosine is notified otherwise by your department, the account you have will remain active for six months. After six months you account and data will be deleted.

Why a Cosine Administrator Account Required on any Machine Connected to the Wired Network

Like any shared community resource, the OSU network requires development, enforcement of policy, and standards to assure efficient operation and remediation of issues. Cosine staff use the administrator account to respond to a user's requests, to assure compliance with Network Security Standards, or to investigate and, if appropriate, deal with the anomalous behavior of a machine. Administrator access is not used casually and certainly not for any purpose to invade personal or professional privacy.

If you have questions or concerns regarding this policy, please contact the Cosine Director.

After I Change My ONID Password

Changing your ONID password

With the new DUO requirements, ONID password changes will become less frequent.  That said, you will still need to change your password after account compromises which can happen by responding to phishing attempts, or malware.  This guide should help you settle back in after a password change.

1) For laptops and phones, update your wifi password so that you can connect to eduroam (or OSU_Secure): https://cosine.oregonstate.edu/faqs/reconfiguring-wi-fi-after-onid-password-change

2) Update all your email clients with your new password: https://cosine.oregonstate.edu/faqs/reconfiguring-email-after-an-onid-password-change

3) For laptops which you login using your ONID account, plug them into OSU's wired network and login so that they pull your credentials from OSU servers and can re-cache them

As Needed:

4) Login to the VPN

5) Remap your T and Z drives on personally owned computers using your new credentials: https://cosine.oregonstate.edu/faqs/data-storage-and-access

6) Lastly, any webservices that you've been logging into with your ONID account will need your new credentials.  You will be reprompted when you connect to them: exmail.oregonstate.edu, webmail.cosine.oregonstate.edu, Microsoft Federation (for Office365 and a few other things), Banner, Canvas, Box, etc.

Cordley 3003 Computer Lab

Using the Presentation LCD TV in Cordley 3003

Using the Presentation LCD TV with Presentation Computer

  1. Turn on the presentation computer on and log in
  2. Turn on the TV by pressing the power button on the right edge of the TV
  3. Set the TV input to (HDMI 1) by using the input button on the right edge of the TV or the remote control provided
  4. The sign located on the computer cart, “Class in session” should be put onto the outside of the door of the classroom.
  5. When finished, log out and turn off the TV
  6.  Remove the sign from the outside of the classroom door and put it back onto the computer cart.

Using the Presentation LCD TV with Laptop

  1.  Connect the VGA cable and the audio cable to the laptop
  2.  Turn on the TV by pressing the power button on the right edge of the TV
  3.  Set the TV input to (Computer) by using the input button on the right edge of the TV or the remote control provided
  4.  The sign located on the computer cart, “Class in session,” should be put onto the outside of the door of the classroom.
  5.  When finished, turn off the TV and unplug the VGA and Audio cable and place it on top of the computer cart.
  6.  Remove the sign from the outside of the classroom door and put it back onto the computer cart.


How to Reserve Cordley 3003

Tudy Seistrup maintains a calendar of current reservations for Cordley 3003.  You can view current reservations through the online calendar.   To make a reservation, please e-mail Tudy.  

What Software is Installed on the Computers in Cordley 3003

The computers in Cordley 3003 all have the following software installed:


  • 123D Design R2.0

  • 7-Zip 16.02

  • Adobe Acrobat XI Pro

  • ArcGIS 10.3 for Desktop

  • AutoCAD 2016

  • BioEdit

  • Blender

  • DIVA-GIS 7.5

  • DNA Master

  • DnaSP v5

  • Epi Info 7

  • FileZilla Client 3.21.0

  • Foldit

  • Gaussian 09W Revision D.01

  • GaussView 5.0.9

  • Geneious 9.0.5

  • Google Chrome

  • Google Earth

  • GPL Ghostscript

  • GSview 5.0

  • HyPhy 2.2.4

  • IBM SPSS Statistics 23

  • ImageMagick 6.7.5-7 Q16

  • Inkscape 0.91

  • IrfanView

  • JMP Pro 11

  • Maple 2015

  • MATLAB R2014b

  • MEGA6 .06

  • Microsoft Office Professional Plus 2013

  • Microsoft Silverlight

  • Mozilla Firefox 45.3.0 ESR

  • Mozilla Thunderbird 45.3.0

  • Notepad++

  • Planform

  • PuTTY release 0.67

  • PyMOL

  • Python 2.7.12

  • QuickTime 7

  • R for Windows 3.2.0

  • RStudio

  • SAS 9.4

  • Scratch

  • SketchUp 2016

  • SplitsTree4 4.13.1

  • SSH Secure Shell

  • STAMP v2.1.3

  • Structure

  • TIBCO Spotfire S+ 8.2

  • TreeView X 0.5.0

  • Wing IDE 101 5.1.7-1

  • Wolfram Mathematica 9

  • XTools Pro 12.0

Data Backup & Restore

How do I Access Cloud Storage

Oregon State provides a few different options for backing up your data to the cloud. Our reccomended service is Box, but you can also use Microsoft OneDrive and Google Drive. 

Box (Reccomended):

oregonstate.account.box.com/login

  • Users have unlimited storage on Box
  • Allows uploads of files and folders (individual files cannot exceed 15gb)
  • Using Box desktop app, you can work and edit from a folder constantly synced to the cloud 
  • Easy sharing and collaboration with others
  • Box integrates with Microsoft Office and Google Web Apps to allow file editing
  • Box isn't suitable for research documents or other classified data

Click here for more info

Microsoft OneDrive:

office.cloud.oregonstate.edu

  • Users get 1tb of storage
  • Create/edit Office files directly from office or OneDrive on the web
  • Allows sharing/collaboration

See here for more info

Google Drive:

drive.google.com

  • Users have unlimited storage
  • Use Google Drive Web Apps directly from Drive
  • Supports sharing of files/folders for collaboration

See here for more info


For more info on data classification/security, see here.

How Can I Work Directly From Cloud Storage

By installing programs from the various cloud providers onto your coomputer, you can work on files directly from the cloud. See below for specifics depending on what cloud storage provider you are using below:

Box:

  • Download Box Drive here
  • Note: If you already have Box Sync, Box Drive will uninstall it automatically. In the future, Box Sync will be depriciated in favor of Box Drive
  • See here for some basics on how to use Box Drive


Google Drive:

  • Download and find instructions for Google Drive File Stream here


OneDrive:

  • Already installed on Windows, you can find your files in Explorer by clicking OneDrive on the left hand side - see here for detailed instructions
  • Download from Mac App Store here


Please contact us if you need any assistance in installing these programs and/or setting them up.

How Can I Use Time Machine to Backup My Mac

Time Machine is a great way to backup and restore all the files on your mac if you have an external storage device (external hard drive, etc.). For details on how to set it up, see: https://support.apple.com/en-us/HT201250

What is Backed up During Cosine's Standard Backup Schedule

 Core IT Services Backup

Data included in the Standard Backup Schedule include:

  • science.oregonstate.edu user Email
  • File server home directories (see Online Storage and Backup)
  • Departmental directories (usually mapped to T:)
  • web.science.oregonstate.edu web sites and MySQL databases

Online Storage

All departments fully supported by COSINe are allocated 10 GB of online server storage space per supported user account. The count of the number of user accounts is calculated during the fall term. The server space is backed up according to the standard COSINe backup schedule.

The intended use of this server space is as a repository for user data files, not as space to save full desktop/notebook backups, or large quantities of research data.

Storage capacity beyond the 10 GB per user limit is described here: Expanded Online Storage

Users are also given personal storage space in their home directory.

* Users also have access to 1TB of temporary storage on T:\Scratch (also accessible via /mnt/scratch on the linux command line). This space will be monitored and anything older than 30 days will be removed.


Standard Backup Schedule

Core IT services data, managed servers and other managed network hosts (see Network Host Backup below) are backed up according to the following schedule on a monthly cycle:


Monthly Full All user files are backed up
Weekly Differential All user files changed since the last full backup are saved
Daily Incremental All user files changed since the last backup are saved


Effectively, this means that user data can be restored to the state it was in at the end-of-day, for any of the previous 30 days.


Data Storage & Access

How do I connect to the T: drive on Windows

Before you start: If you are connecting from off campus, you will need to connect through the VPN

Step 1: Open the start menu, scroll down to the bottom and inside (click to open) Windows System choose File Explorer:

Start Menu > (rclick) Computer > Map network drive

Step 2: Select "This PC", then "Computer", then "Map network drive":

Map network drive

Step 3: In the dialog box, select T for the drive letter, paste: "\\cos-dfs.science.oregonstate.edu\dfs-users" as the folder, and check Connect using different credentials (you can tick Reconnect at sign-in if you want) in the folder like so:

Fill T drive information

Step 4: Click finish.

Step 5: In the dialog box that pops up enter your ONID username (without the greater than or less than signs) and password. You may also check Remember my credentials, especially reccomended if reconnect at sign in is turned on:

Enter credentials

Step 6: You are now connected! The folder should pop up like so:

T Drive Contents

Note: While you may be able to see all of the folders, you will only have access to certain folders.  If you don't have access to a folder that you should, ask your department to submit a ticket to us.

How do I connect to the T: drive on MacOS

Before you start: If you are connecting from off campus, you will need to connect through the VPN

Step 1: Click finder icon in the dock

Step 2: Click "Connect to server..." from the "Go" menu at the top of the screen

Step 3: Enter "smb://cos-dfs.science.oregonstate.edu/dfs-users" as the Server Address

Step 4: Click Connect

Step 5: In the dialog box that pops up enter your ONID username (without the greater than or less than signs) and password. You may also check Remember this password:

Step 6: Click Connect again.

Step 7: You are now connected! The folder should pop up like this:

 Note: While you may be able to see all of the folders, you will only have access to certain folders.  If you don't have access to a folder that you should, ask your department to submit a ticket to us.

How do I connect to the Z: drive on Windows

Before you start: If you are connecting from off campus, you will need to connect through the VPN

Step 1: Open the start menu, scroll down to the bottom and inside (click to open) Windows System choose File Explorer:

Start Menu > (rclick) Computer > Map network drive

Step 2: Select "This PC", then "Computer", then "Map network drive":

Map network drive

Step 3: In the dialog box, select Z for the drive letter, paste: "\\pfs.cosine.oregonstate.edu\homes" as the folder, and check Connect using different credentials (you can tick Reconnect at sign-in if you want) in the folder like so

z drive dialog popup

Step 4: Click Finish.

Step 5: In the dialog box that pops up enter your ONID username (without the greater than or less than signs) and password. You may also check Remember my credentials, especially reccomended if reconnect at sign in is turned on:

Enter credentials

Step 6: You are now connected! The folder should pop up like so:

Note: These files aren't shared with anyone and you only have 10GB.  If you need more space, let us know.

How do I connect to the Z: drive from MacOS

Before you start: If you are connecting from off campus, you will need to connect through the VPN

Step 1: Click finder icon in the dock

Step 2: Click "Connect to server..." from the "Go" menu at the top of the screen

Step 3: Enter "smb://pfs.cosine.oregonstate.edu/homes" as the Server Address

Step 4: Click connect

Step 5: In the dialog box that pops up enter your ONID username (without the greater than or less than signs) and password. You may also check Remember this password:

Step 7: You are now connected! The folder should pop up like this:

 Note: These files aren't shared with anyone and you only have 10GB.  If you need more space, let us know.

How can I Access my Office Computer's Files Remotely (via SSH)

1. From your desktop, navigate through the start menu to open “Secure File Transfer Client”

1.jpg

2. Once the program opens, click on file in the menu bar and then click on “quick connect”.

2.jpg

3. Enter host as shell.cosine.oregonstate.edu along with your username.

3.jpg

4. Click yes to saving the new host key.

4.jpg

5. Enter your password

5.jpg

6. At this point, your files should be shown in the right window. The files on the computer you're currently using are in the left window. Any files you put in your public_html directory will be served to the webserver and be accessible at http://science.oregonstate.edu/~USERNAME/

6.jpg


How do I Connect to my Work Computer With Remote Desktop

Please see: https://oregonstate.teamdynamix.com/TDClient/1935/Portal/KB/ArticleDet?ID=101648


Email Configuration & Setup

How do I setup Exchange Online on Outlook, Mac Mail, or my Mobile Device

See the following page for device setup instructions:

https://is.oregonstate.edu/exchangeonline/device-setup

How do I setup Exchange Online in Thunderbird

To fully setup your account in Thunderbird, we need to first add it, then subscribe to your mail folders.

Setting Up Exchange Account in Thunderbird:

1) Click the three line button in the top right of Thunderbird and select "Account Settings"

Selecting Account Settings in Thunderbird

2) In the bottom left, click "Account Actions", then select "Add Mail Account"

Adding Mail Account in Thunderbird

3) A new window will popup. Enter your email address as either ONID@oregonstate.edu or first.last@oregonstate.edu, depending on whichever one you'd like your emails to send-as. Enter your ONID password. After this, hit "Configure Manually" in the bottom left. Enter the following server details:

Incoming

  • Protocol: IMAP
  • Server: outlook.office365.com
  • Port: 993
  • SSL: SSL
  • Authentication:  Normal Password
  • Username: yourONIDusername@oregonstate.edu


Outgoing

  • Server: smtp.office365.com
  • Port: 587
  • SSL: STARTTLS
  • Authentication:  Normal Password
  • Username: yourONIDusername@oregonstate.edu

Initial Server SettingsAdvanced Server Settings

Your account should now be added! You can close out of the Account Settings tab now.

Note: Make sure you are sending from the new account you added. To make sure, check the "From" field when you compose a new message. The email address you're using will be in white, while the grey text is the account name you can set in "Account Settings". You should see your ONID@oregonstate.edu or first.last@oregonstate.edu in the white color if you're sending from Exchange:

Send from field in Thuunderbird

Subscribing to Folders in Thunderbird:

In Thunderbird, you must "Subscribe" to a folder before it will show up in the list. To do that, follow these instructions:

1) Right click your Exchange account in the list on the left, then select "Subscribe"

Right clicked exchange account, selecting Subscribe

2) Click the checkbox next to the Folders you want to show up in the list. You may select all of them, or just the ones you intend to use. After click "Done".

You should now see these folders show up under your Exchange account in the list. It may take some time for the messages to download, especially if you have a large mailbox.

Note: If your email is in the process of being migrated and you have not yet received the Sync Complete email, your folders will not yet be in this list. Please follow these steps again after your receive the Sync Complete message.

Setting Storage/Sync Settings:

By default, Tunderbird will download all messages from your Inbox and subscribed folders onto your computer. If you want to save disk space, you can set it to only download the contents of messages from recent messages. You will still be able to see old messages, the message content will just not be downloaded untill you select the message.

To do this, go back into "Account Settings" and change the "Disk Space" setting. You can select the bubble next to "Synchronize the most recent", then pick a date range of your preference. You also have the option to not download large messages by ticking the box next to "Don't download messages larger than".

How do I add a shared Mailbox to Outlook

See the following page for adding a shared mailbox to Outlook: 

https://oregonstate.teamdynamix.com/TDClient/1935/Portal/KB/ArticleDet?ID=45717

How do I add a shared mailbox to Mac Mail

1) Open Mac Mail. Once opened, click "Mail", then "Preferences" on the top menu bar.

After opening mail. click mail-> preferances in the top bar

2) In the bottom left of the "Accounts" window, click the plus button.

Click the Plus in the bottom right of the accounts window

3) Select "Other Mail Account" and hit "Continue".

Select "Other Mail Account" and hit "Continue"

4) A new window will popup. Enter your name in the "Name" field. Enter the email address of the shared mailbox in "Email Address". Enter your personal ONID password in "Password". After this, hit "Sign In" on the bottom right.

Filling in the three fields mentioned above

5) Four more inputs should appear. Fill them in as follows:

  • Username: yourONIDusername@oregonstate.edu\shared-mailbox-UPN
  • Account Type: IMAP
  • Incoming Mail Server: outlook.office365.com
  • Outgoing Mail Server: smtp.office365.com


It is important you enter the username exactly as above, with your username first, then a "\", then the UPN of the shared mailbox. The UPN of the shared mailbox is usually different from the email address. Contact the Cosine Helpdesk if you are unsure of your UPN.

Lastly, click "Sign In"

Filling in server details and Username

6) You should now see the account in the left column of the "Accounts" window. Click the account, then click "Server Settings" from the bar. In this window, change the "Username" under "Outgoing Mail Server" to just yourONID@oregonstate.edu. Do not edit the username for the incoming mail server.

Editing the sending user name in the accounts window

7) Next, uncheck both "Automatically manage connection settings" boxes.

Unchecking both boxes

8) Lastly, verify your incoming port is set to 993 and your outgoing port is set to 587. Additionally, check that the "Use TLS/SSL" box is checked and "Authentication" is set to "Password" for both incoming and outgoing. See the screenshot below:

setting port numbers

9) Your shared mailbox should now be added to Mac Mail!

How do I add a shared mailbox to Thunderbird

To add a shared mailbox to Thunderbird, we must first add the account, then subscribe to the folders

Adding Shared Mailbox to Thunderbird:

1) Click the three line button in the top right of Thunderbird and select "Account Settings"

Clicking the Three Lines button on top right, than clicking Account Settings

2) In the bottom left, click "Account Actions", then select "Add Mail Account"

Clicking Account Settings, than Add Mail Account

3) A new window will popup. Enter your name in the "Your Name" field. Enter the email address of the shared mailbox in "Email Address". Enter your personal ONID password in "Password". After this, hit "Configure Manually" in the bottom left. Enter the following server details:

Incoming

  • Protocol: IMAP
  • Server: outlook.office365.com
  • Port: 993
  • SSL: SSL
  • Authentication:  Normal Password
  • Username: yourONIDusername@oregonstate.edu\shared-mailbox-UPN


It is important you enter the username exactly as above, with your username first, then a "\", then the UPN of the shared mailbox. The UPN of the shared mailbox is usually different from the email address. Contact the Cosine Helpdesk if you are unsure of your UPN.

Outgoing

  • Server: smtp.office365.com
  • Port: 587
  • SSL: STARTTLS
  • Authentication:  Normal Password
  • Username: yourONIDusername@oregonstate.edu


The username in the outgoing field will automatically fill in with the username from the incoming field. It is important that you delete the shared mailbox UPN portion of the username, and enter only yourONIDusername@oregonstate.edu.

Note: You may have to click "Re-Test" before hitting "Done".


Entering Name, Email Address, and Password, then clicking Configure ManuallyFilling in server details

Your shared mailbox account should now be added!

Subscribing To Folders in Thunderbird

In Thunderbird, you must "Subscribe" to a folder before it will show up in the list. To do that, follow these instructions:

1) Right click your Shared Mailbox account in the list on the left, then select "Subscribe"

Right clicked exchange account, selecting Subscribe

2) Click the checkbox next to the Folders you want to show up in the list. You may select all of them, or just the ones you intend to use. After click "Done".

You should now see these folders show up under your Shared Mailbox account in the list. It may take some time for the messages to download, especially if you have a large mailbox.


For additional Thunderbird settings, see the "How do I setup Thunderbird for Exchange Online" FAQ above

How to setup an ONID (gmail) account on an iOS device

Note: These instructions are not for Exchange accounts, but rather ONID Gmail accounts. See "How do I setup Exchange Online on Outlook, Mac Mail, or my Mobile Device" for help setting up Exchange.

http://oregonstate.edu/helpdocs/e-mail/onid-e-mail/configuring-email-clients/mobile-devices/onid-email-iphone-ipod-ipad

How do I send mail as my First.Last@oregonstate.edu from Google Mail

Step 1: Open Google Mail and open the settings:
Open the settings in Gmail

Step 2: Switch to the accounts tab:
Switch to the accounts tab

Step 3: Click the link to "Add another email address" underneath the "Send email as" section:
Click the link to add another email address

Step 4: In the new window, enter the email that you would like to send as.  You can use any of the email addresses that you have at OSU.  A few examples include Evan.Brass@oregonstate.edu, brassev@math.oregonstate.edu, Scholastic.Arts@oregonstate.edu, etc.  Be sure to uncheck treat as alias, unless you know that you check the email addresses seperately and you are sure you want to see those emails in the account you're logged into.  This is a rare case.
Enter the email you want to send as and uncheck treat as alias

Step 5: The confirmation process can change, in some cases, you may be asked to set up a connection to campus mail servers but in most cases, you'll be asked if you want to have a confirmation code send to that address to confirm that you control it.  If you are prompted to enter server settings, use the settings below or click "Send verification":

  • Outgoing Server: smtp.office365.com
  • Port: 587 (START/TLS)
  • Username format: username@oregonstate.edu

Click send verification

Step 6: Enter the verification number you receive in the address you would like to send as:
Enter the verification number

Step 7: To send an email as that account, start creating the email and then click on the from address to switch to your new account:
Change your from address when composing

How do I report a Phishing email

See the following guide for instructions on reporting phishing emails:

https://oregonstate.teamdynamix.com/TDClient/1935/Portal/KB/ArticleDet?ID=80695

What are the General Settings for the Science Mail Servers (Depreciated)

The science mail servers can be connected to using the following settings:

  • Username field: onidusername
  • Incoming Mail Server: imap.science.oregonstate.edu
  • Outgoing Mail Server:smtp.science.oregonstate.edu
  • SSL Port: 465 (outgoing) or 993 (incoming)

Printing

Removing a printer on Windows

  1. Open Devices and Printers:
  2. Find the old printer and right click it, and click remove:
  3. In the dialog, click yes:
  4. Contine with the instructions for adding a printer on Windows: Adding a Printer on Windows

Adding Printers on Windows

There are two ways to add a printer on Windows.  Whenever possible, please add printers using our print server.  If a printer is not on the print server, then add the printer by hostname.  Please do not add printers by IP address as they are subject to change wihtout warning.

Print Server (for university owned, on domain computers)

  1. You will need the name of the printer.  This will look like “<Building Name><Room#>prn<Printer #>”  Ex: “BEXL032prn4”  Your building manager may have this information.  If they don’t then give us a call.
  2. Hold the Windows key and press R to open the run dialog.  In the run dialog type “\\cos-print.science.oregonstate.edu”
  3. You can browse for the printer or search for it.  When you find the printer you want, double click it to install it.
  4. Once it finishes installing, you should see the printing queue for the printer like this
  5. If the printer you are installing is a Ricoh copier, then follow the steps here: Ricoh Code - Windows. 
  6. Print a document and call us if you have any trouble.

Hostname (personal computers and printers that are not on the print server)

  1. You will need the Hostname of the printer.  Your office manager may have this information.  If not, give us a call and we can find it for you. Ex: “kidd073-prn1.science.oregonstate.edu”
  2. Press the windows key and search for “Printers &Scanners”
  3. In Printers & Scanners, click “Add a printer or scanner”
  4. Click “The printer that I want isn’t listed”
    red box outlining "the printer I want isnt listed"
  5. Select “Add a printer using a TCP/IP address or hostname” and click next.
  6. Enter in the printer’s hostname for the hostname and port name. Make sure that “Query the printer and automatically select the driver to user” is checked.  Click next.
  7. If you see a window that look like this that asks you to install the printer driver, then you have two options and a backup: 1) If the printer is one of the new ricoh printers (2017 deployment), then you should be able to find the drivers at the bottom of this page: http://cosine.oregonstate.edu/ricoh-copier-deployment-spring-2017 2) You can ask Windows Update to find the drivers. Backup) Give us a call and we can install the driver and printer for you.
  8. Otherwise, you should be given the option to name the printer.  You can call it whatever you like and click next.
  9. Select “Do not share this printer” and click next:
  10. You can set the printer as your default if you want.  Click finish.
  11. You are now connected to the printer.  If you are adding a Ricoh copier, see Ricoh Printing Codes below.

Adding a printer MacOS

  1. You will need the Hostname of the printer.  Your office manager may have this information.  If not, give us a call and we can find it for you. Ex: “kidd073-prn1.science.oregonstate.edu”
  2. Use Spotlight Search to find printers and scanners: Press the mac key and space, then type “printers and scanners”.  Press enter:
  3. Switch to the IP tab:
  4. Set the Protocol to “HP Jet Direct – Socket”:
  5. Enter the printer’s hostname in the address field, a descriptive name in the name field and check to make sure that the proper driver is found in the use field:
  6. If you see “Generic Postscript Driver” in the use field, then you have two things you can do: 1) If the printer is part of the new Ricoh deployment (2017) then you should be able to find a link to the driver at the bottom of this page: http://cosine.oregonstate.edu/ricoh-copier-deployment-spring-2017 2) Give us a call and we will install the driver and printer for you.
  7. Click add.  You should see a dialog somewhat like this:
  8. Once that dialog closes, the printer will be available.  If the new printer is a Ricoh copier that requires a printing code, then see Ricoh Code - MacOS below.

Ricoh Code - Windows

  1. Press the windows key and search for “Devices and Printers”
  2. Find the Ricoh Copier in the list of printers and right click it:
  3. Select the detailed settings tab:
  4. Click Job Setup:
  5. Enter your printing code (Same as your copier code) into the user code box:
  6. Click Ok.  Then send a test print to the printer.  If it doesn’t print then give us a call.

Ricoh Code - MacOS

  1. Not all Ricoh copiers require a printing code.  Your office manager may know whether you need one or not.  It will be the same as your copier code if you have one.
  2. Open a document and print it using the printing dialog (Press command + p):
  3. Switch to the “Job Log” tab:
  4. Click “Enable User Code” and type your printing code into the User Code field:
  5. Under Presets, select “Save Current Settings as Preset”:
  6. Give the preset a descriptive name, like “Ricoh - with code”, and check “All printers”
  7. Note: Any time that you print to a Ricoh printer, you will need to select this preset.

Purchasing

Can Cosine Assist me with my Technology Purchases

Yes, we're happy to find hardware and software for your needs and recommend contacting us first to leverage our educational discounts, bulk pricing, and vendor relationships. We also prefer to verify the hardware you're considering purchasing is something we'll support long into the future: https://cosine.oregonstate.edu/cosine-policies-procedures#PC%20Hardware%20Support.
 
Please create a ticket using our web form,  email <purchasing@science.oregonstate.edu>, or call our Purchasing Coordinator, Tudy Seistrup, at 541-737-0042 to get the conversation started.
 
OSU also offers university-licensed software: https://is.oregonstate.edu/service/central-software-distribution. 
For more details on getting software, see: How Do I Obtain Other Software.

What are the Minimum Recommendations for New Hardware

Desktop

Intel i5 or AMD Ryzen 5

8 GB RAM 

250+GB SSD

Laptop

Intel i5 or AMD Ryzen 5

8 GB RAM

250+GB SSD

802.11b/g/ac wireless


What Software does Cosine Install on New Computers (Standard Build)

Computer software we install by default 

Software Windows Macintosh Linux
Operating system Microsoft Windows 10 Enterprise macOS Ubuntu 20.04
Office Microsoft Office 2019 Microsoft Office 2019 LibreOffice
Ant-Virus System Center Endpoint Protection ESET Antivirus N/A
Web Browser Internet Explorer, Mozilla Firefox Safari Mozilla Firefox
Email Mozilla Thunderbird Built In Mozilla Thunderbird
PDF Reader Acrobat Acrobat 2020 Built In Built In
Secure Shell Putty Built in Built In
FTP FileZilla Built In Built In
Archive Tool 7-Zip Built In Built In

How Do I Obtain Other Software (EndNote, SAS, Photoshop, etc...)

Software not included in the standard build (see Software Installed on a new computer) usually requires that a license be purchased prior to installation. Most of the often-requested software can be purchased/obtained from the university central software distribution.  Most of that software has the installation media located on a network share located at \\software.oregonstate.edu\software for Windows and smb://software.oregonstate.edu/software for macs.  You'll only have access to the software folders for which you've received an email confirming your licensing from the Software Coordinator.  We're happy to help you through that process and we may even be able to do it for you if we're building your computer at the helpdesk.

For a more general list of computer software, see OSU Software Portal.

Additionally, various departments have access to different software online through Citrix.  Please login into apps.oregonstate.edu to see if what your looking for is available virtually.

For software not found on these services, the university often gets discounts, so we reccomend checking in with us before making any purchases. See: Can Cosine Assist me with my Technology Purchases.

Note: Legal use of all software by OSU departments, faculty, staff and students is essential, so please make sure you are familiar with the license restrictions for any of the software you install or license throught he university. Once you leave the university, you must remove all site-licensed software from your personal computers.  Any valid licenses on your work computers may be transferred to another employee.

Reconfiguring Wi-Fi After an ONID Password Change

Android - OSU_Secure

  1. Open the settings app, then click "Network & Internet":
    Open Network & Internet
  2. Next open the Wi-Fi Settings:
    Open Wi-Fi Settings
  3. Press and hold on OSU_Secure, then tap forget:
    forget OSU_Secure
  4. After it forgets the network, reconnect to OSU_Secure:
    Reconnect to OSU_Secure
  5. Enter the following settings, then click connect:
    EAP Method: PEAP
    Phase 2 authentication: MSCHAPV2
    CA certificate: Use system certificates
    Domain: oregonstate.edu
    Identity: Your ONID Username
    Anoymous Identity: Leave Blank
    Password: Your ONID Password
    Configure OSU_Secure

iOS - OSU_Secure

  1. Open settings and switch to the WiFi section:
    Open Settings and switch to the WiFi section
  2. Select OSU_Secure and forget it.  Click forget at the prompt:
    Select OSU_Secure and click forget
    Click forget at the confirmation dialog
  3. Click OSU_Secure to reconnect to it:
    Select OSU_Secure to reconnect to it
  4. Enter your new ONID credentials and click join:
    Enter your new ONID credentials and click join
  5. If you're prompted to trust the Oregon State wifi certificate, then click trust:
    Trust the Oregon State WiFi certificate

MacOS - OSU_Secure

  1. Open Network Preferences:
    Open Network Preferences
  1. In the WiFi section, go to Advanced:
  2. Select OSU_Secure and then hit the minus sign to remove it:

    Then click OK to save and close.
  3. Back in the WiFi menu, connect to OSU_Secure:
    Reconnect to OSU_Secure
  4. Enter your ONID Username and Password when you're prompted:
    Enter your new ONID credentials
  5. Click Join.  If you are still unable to connect to the wireless then give us a call or stop by our office.

Windows - OSU_Secure

Most of the time, Windows will smoothly prompt you for your new credentials when you attempt to connect to OSU_Secure from on campus. If for some reason this doesn't happen, then there's a few steps to force Windows to perform a fresh connection:

  1. First, Open the networking menu by clicking the wifi icon in the lower right hand corner:
    Open the networking tray
  2. Open Network Settings:
  3. Select "Manage Wi-fi Settings":
  4. Select OSU Secure and click forget:

  5. Reopen the wifi menu:

    Select OSU_Secure:

    Then click connect:
  6. You will most likely get a warning asking if you expect to find OSU_Secure in your area.  If you're on campus, then click connect:
  7. Then enter your ONID credentials and click ok:

Linux - eduroam

If all goes well, on Ubuntu you should simply be prompted for your new password with a dialog like this:
Picture of the Ubuntu wifi credential request dialog

If you don't get one of those or you need to start connecting from scratch do this:

  1. Open the wifi settings and click the gear icon next to "eduroam":
    Open the eduroam wifi settings
  2. Click forget network:
    Click forget network within eduroam's settings
  3. Click on the eduroam SSID to open the connection dialog:
    Open the eduroam connection dialog
  4. Enter the following connection information:
    Wi-Fi Security: Leave as "WPA & WPA2 Enterprise"
    Authentication: 
    Change to "Protected EAP (PEAP)"
    Anonymous identity: Leave this field blank
    Domain: Enter "oregonstate.edu"
    CA certificate: Leave as "(None)"
    CA certificate password: Leave this field blank
    No CA certificate is required: Check this checkbox
    PEAP version: Leave as "Automatic"
    Inner authentication: Leave as "MSCHAPv2"
    Username: Enter your ONID username followed by "@oregonstate.edu" here
    Password: Enter your ONID password here
    Enter the eduroam authentication settings
  5. Lastly, click connect.  If you are unable to connect then please give us a call or stop by our helpdesk.  If the password or username is incorrect then you should see the username and password dialog from the first screenshot.

Software Tools & Fixes

SSH & SFTP Software

SSH & SFTP Software


There are a few good choices SSH and SFTP programs for Windows.

  • SSH Secure Shell Client
    • You can install this software from T\Applications\Tools
  • MobaXterm
    • This is a freeware SSH, SFTP, Remote Application Launcher.  You can SSH in, copy files and launch applications remotly and run them on your computer with a simple installer.  Download the free version for use MobaXterm
  • PuTTY with WinSCP
    • Getting the installer version of PuTTY and then installing WinSCP is the simplest way to get these two programs connected for SSH and SFTP.
    • PuTTY
    • WinSCP

OSU VPN Software

VPN is a program that you can use in order to access the OSU network from home, just as if you were on-campus.

Please see this guide for details on how to install and setup the OSU VPN. For a list of services that require the use of the VPN, see this list.

Note: As of Sep 18th, 2020, the old VPN (sds.oregonstate.edu) is no longer enabled. See the guide above or contact us for information on the new service, vpn.oregonstate.edu.


Dreamspark (MSDNAA) Software Downloads

Certain Microsoft software is provided at no cost by Microsoft's academic alliance program.


The page to login and access the software can be found here.

ConnectWiseControl Client macOS 10.15 Fix

1. Go to support.oregonstate.edu.  We will provide you with a code to enter in the "Join with a code" field. After typing in the code, the arrow will turn red. Click the arrow to begin the download of the ScreenConnect software.

 OSU's Remote Support Website: support.oregonstate.edu

2. If you are downloading for the first time on a Mac, select "Download App."Support prompt asking if you want to run or download the app.

3. If you web browser prompts you to allow downloads from support.oregonstate.edu, select "Allow."

Safari Asking If You Want To Allow support.oregonstate.edu To Download Items

4. Insert a step and screen-shot on how to loate the downloaded file.

macOS telling the user that Apple cannot check to see if the software is malicious or not

5. A prompt may appear asking you to open "Security & Privacy" or "Deny." Select "Open" or navigate to System Preferences > Security & Privacy.

macOS System Preferences With Red Arrow Pointing To Security and Privacy

6. Click the pad lock in the lower left-hand corner of the  Security & Privacy window and enter your system password to allow changes. On the General tab, select "Open Anyways."

macOS System Preferences asking do you want to open Connect Wise Control Client

7. Select the "Privacy" tab.

8. Select "Accessibility" and check the box next to "ConnectWiseControl Client."

macOS System Presences Privacy Pane Accessibility

9. Do the same for Screen Recording.

10. Your CoSINe Helpdesker should be able able to see and control your screen now.

Unix HPC Cluster

How do I connect to the cluster?

If you are currently a Cosine customer you already have access to our cluster. To access the server, SSH into submit.hpc.cosine.oregonstate.edu using your cosine/science username and password.

 If connecting from Off campus, please refer to I can't connect to the cluster from off campus.

Join the Cosine HPC mailing list for notifications about software updates and maintenance. Visit http://lists.science.oregonstate.edu/mailman/listinfo/cosine-hpc


How is storage handled on the Cluster?

User home directories on the cluster are provided by a dedicated server with 26TB of disk space. For performance reasons, this space is not backed up.

How can I bring my science home (Z:) to the cluster?

  1. Create a directory in your home for the z drive mount point
  2. sshfs shell.cosine.oregonstate.edu: <your mount point>
  3. Please copy files from zdrive to cluster home before execution

Example

mkdir ~/zdrive

sshfs shell.cosine.oregonstate.edu: ~/zdrive


How do I view and set my environment?

The cluster uses the environments module to provide an easy way to switch between software revisions. These modules configure environmental variables such as PATH for each piece of software. 

To get a list of available modules to load, execute:

module avail

To get a list of what modules are currently loaded, execute:

module list 

To load the Matlab 2014b module, execute

module load matlab/R2014b 

To display modules set to load during login:

module initlist

To set a module to automatically load during login:

module initadd matlab/R2014b

To remove a module from loading during login:

module initrm matlab/R2014b


How do I submit a job?

Jobs should be submitted using a special sh script which tells the scheduler how to handle the job.

An example with common options can be seen below: 

 submit.sh

#!/bin/sh

# Give the job a name #$ -N example_job # set the shell #$ -S /bin/sh # set working directory on all host to # directory where the job was started #$ -cwd # send all process STDOUT (fd 2) to this file #$ -o job_output.txt # send all process STDERR (fd 3) to this file #$ -e job_output.err # email information #$ -m e # Just change the email address. You will be emailed when the job has finished. #$ -M myusername@science.oregonstate.edu # generic parallel environment with 2 cores requested #$ -pe orte 2 # Load a module, if needed module load sprng/5 # Commands ./my_program


If necessary, make my_program executable

chmod +x my_program

Submit the job

qsub submit.sh

How do I check the status the queue?

qstat is used to check the status of jobs on the cluster. By itself it will show a brief overview

qstat

To show the status of all nodes and queued processes, execute

qstat -u '*'


The state codes that dare displayed in the last column of qstat are as follows:

Category State SGE Letter Code
Pending pending qw
  pending, user hold qw
  pending, system hold hqw
  pending, user and system hold hqw
  pending, user hold, re-queue hRwq
  pending, system hold, re-queue hRwq
  pending, user and system hold, re-queue hRwq
Running running r
  transferring t
  running, re-submit Rr
  transferring, re-submit Rt
Suspended job suspended s, ts
  queue suspended S, tS
  queue suspended by alarm T, tT
  all suspended with re-submit Rs, Rts, RS, RtS, RT RtT
Error all pending states with error Eqw, Ehqw, EhRqw
Deleted all running and suspended states with deletion dr, dt, dRr, dRt, ds, dS, dT, dRs, dRS, dRT

How do I get the status of a job?

If a job is currently running:

qstat -j <jobId>

After a job has been executed:

qacct -j <jobId>

How do I delete a job?

The command:

qdel <job id of process>

Is used to remove a job from the queue. If the job is in a dr state the -f flag must be used to force the job to stop. The job ID is supplied as an argument to qdel.

How do I make sure a node has enough memory?

Nodes in the all.q have mixed memory sizes. To ensure that a job lands on a node with enough memory, the mem_free resource can be used.

For example. to execute on nodes with at least 60GB of RAM available:

qsub -l mem_free=60G submit.sh

How do I use R on the cluster?

Create a Submission File

Place the following code into a .sh file (i.e. submit.sh):

#!/bin/sh
# Give the job a name
$ -N JOB_NAME
# set the shell
$ -S /bin/sh
# set working directory on all host to directory where the job was started
$ -cwd
# send all ERROR messages to this file
$ -e errors.txt
# Change the email address to YOUR email, and you will be emailed when the job has finished.
$ -m e
$ -M email_address@oregonstate.edu
# Ask for 1 core, as R can only use 1 core for processing
$ -pe orte 1
# Load the R Module
module load R
# Commands to run job
R inputFile.r > outputFile.out


Submit the Job to the Cluster

Type the following commands, replacing "submit.sh" with the name of your .sh file:

qsub submit.sh

R Examples

can be found on the cluster inside the /cm/shared/examples/R folder

How do I Install R libraries?

You can download and install any R Libraries which you might need to run on the cluster into your home directory and simply use them from there. These instructions give you the steps to accomplish this.

 ssh to the cluster

  1.  Load R module
    module load R
  2. Launch R
    R
  3. Type the command to install the desired package
    install.packages("package_name") 


If this is the first time you have run the install.packages() command, you will be asked if you want to create a personal library.  Answer 'y'.

 Follow the prompts to pick a mirror, etc.


R will download and install the library into the newly created personal library (in your home directory).

To use this library, use the library command (like any other installed library):

library(library_name)

How do I use Gaussian on the Cluster?

Create a Submission File

Place the following code into a .sh file (i.e. submit.sh):

#!/bin/sh
# Give the job a name
$ -N JOB_NAME
# set the shell
$ -S /bin/sh
# set working directory on all host to directory where the job was started
$ -cwd
# send all ERROR messages to this file
$ -e errors.txt
# Change the email address to YOUR email, and you will be emailed when the job has finished.
$ -m e
$ -M email_address@oregonstate.edu
# Use 4 cores for processing
$ -pe orte 4
# Load the Gaussian Module
module load gaussian/g16
# Commands to run job
g16 < inputFile.com > outputFile.out


Submit the Job to the Cluster

Type the following commands, replacing "submit.sh" with the name of your .sh file:

qsub submit.sh

Gaussian Examples

Examples for Gaussian can be found on the cluster inside the /cm/shared/examples/g09 folder

How do I use MATLAB on the cluster?

Thanks to the new campus agreement with Mathworks, Matlab Distributed Computing Server is available and installed on the Cosine cluster. 

In order to use matlab, the module must be loaded

$ module avail matlab

$ module load matlab/R2014b

Interactive Matlab

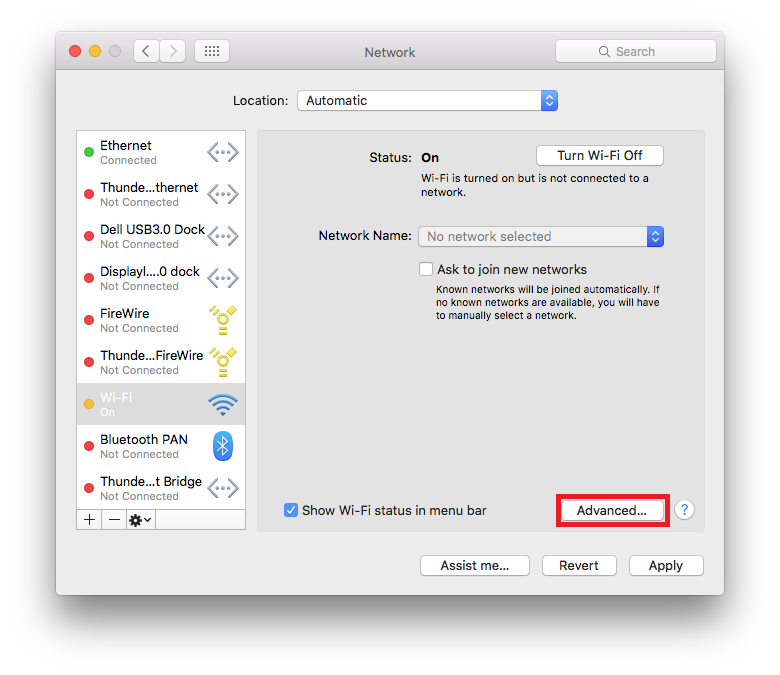
Interactive Matlab sessions can be run in text-only mode or using the full Matlab GUI:

  • the matlab command will try to start the Matlab desktop GUI using X-Windows, if X is not available, then a text-only session will be started
  • to specify a text-only interactive Matlab session use matlab -nodisplay.

If you want to run a text-only Matlab session, you should:

  • log in to the cluster e.g. using
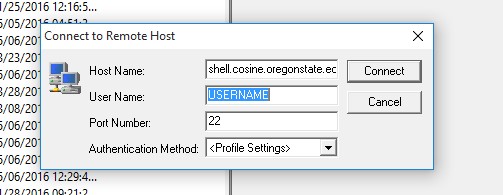
 ssh ...
  • start a session on a node on the cluster using qlogin -pe orte <numberOfCoresRequested>
  • from this session, you should:
    • load the appropriate Matlab module e.g. module load matlab
    • start Matlab using matlab -nodisplay


Non-Interactive Matlab Jobs

There are three main categories of non-interactive Matlab SGE jobs that you can run on the cluster:

  • array jobs run multiple copies of a job across the cluster differentiated by a task ID;
  • distributed jobs use Matlab Distributed Computing Server (MDCS) to run across nodes on the cluster and allow communication between tasks.


Array jobs

Array jobs should be used when the job does not require any synchronisation between tasks. The script will be launched multiple times, with a varying index. The index is accessible via the environment variable SGE_TASK_ID.

Typical uses of array jobs would include:

  • processing a set of input files with each job processing a different file;
  • processing a single large file using multiple jobs each of which processes a section of the file;
  • examining the performance of a model using multiple sets of model parameters.

An example can be found on the cluster in:

/cm/shared/examples/matlab/array


Distributed Jobs

Rather than submitting SGE jobs that execute Matlab scripts on the cluster nodes, distributed jobs launch tasks on cluster nodes from within Matlab. Distributed jobs require the cluster to be configured within Matlab, and submission scripts which define how tasks should be launched on cluster nodes. The submission of the jobs is performed via Matlab GUI or command line interface.

In order to distributed jobs, you should:

  1. Configure Matlab to use the cluster, either using a cluster profile or programmatically
  2. Create a independent and/or communicating job submission script
  3. Submit (run) your job


Matlab cluster profiles

Using GUI configuration utility

In order to configure it, start Matlab GUI and then go Parallel -> Manage Cluster Profiles 

New Window will pop up. In the new window, click on Add -> Custom -> Generic


New profile will be created. Re-name it to something sensible (you will be referring to it through the code). Lets call it Cosine.

Next, make sure you have provided the following info in the Properties tab (leaving all of the other options as default:


Main Properties
Description of this cluster: Cosine HPC
Folder where cluster stores job data: use default (unless you want to specify alternative location)
Number of workers available to the cluster: 32
Root folder of MATLAB installation for workers: use default
Cluster uses MathWorks hosted licensing: false
Submit Functions
Function called when submitting independent jobs: @independentSubmitFcn
Function called when submitting communicating jobs: @communicatingSubmitFcn
Cluster Environment
Cluster nodes' operating system: Unix
Job storage location is accessible from client and cluster nodes: yes
Workers
Range of number of workers to run the job: [1 32]
Jobs and task functions
Function to query cluster about the job state: @getJobStateFcn
Function to manage cluster when you call delete on a job: @deleteJobFcn


Note, that once profile has been loaded, you can override the settings from the submission script

Once the profile has been set up click ok. Next select newly created profile, and validate the configuration.

 
Importing Cluster Profiles

You can import a profile using either the Cluster Profile Manager or the Matlab parallel.importProfile(filename) command.

parallel.importProfile('/cm/shared/examples/matlab/distributed/Cosine.settings');

To import settings from the Cluster Profile Manager, use:

  • Parallel -> Manage Cluster Profiles
  • Add -> Import
  • and select the appropriate settings file.
 
Programmatically

Rather than using a previously defined cluster profile, the cluster details can be configured ad-hoc in a .m script file:

cluster = parallel.cluster.Generic();
cluster.NumWorkers = 32;
cluster.JobStorageLocation = '/homes/cosine/helpdesk/matlab/';
cluster.IndependentSubmitFcn = @independentSubmitFcn;
cluster.CommunicatingSubmitFcn = @communicatingSubmitFcn;
cluster.OperatingSystem = 'unix';
cluster.HasSharedFilesystem = true;
cluster.GetJobStateFcn = @getJobStateFcn;
cluster.DeleteJobFcn = @deleteJobFcn;
cluster.RequiresMathWorksHostedLicensing = false;

To save the cluster definition as a profile for later re-use, use:

cluster.saveAsProfile('Cosine')

To load a previously saved cluster definition, use:

cluster = parcluster('Cosine')
 
Passing Additional Parameters to SGE

If you want to pass additional arguments to the SGE specify the submit function as {@communicatingSubmitFcn, 'list_of_additional_qsub_parameters'}

e.g. to specify that 4GB of memory should be requested, and that emails should be sent to name@domain.name at the beginning and end of the job the submit functions should be specified as:

cluster = parcluster('Cosine');
cluster.CommunicatingSubmitFcn = {@communicatingSubmitFcn, '-l h_vmem=5G -m be -M name@domain.name'};
pp = parpool(cluster);
parfor i=1:10
        hn = system('hostname');
        disp(hn);
end
...
delete(pp)

Make sure that the options you pass to the qsub command are syntactically correct, otherwise the job will fail (see the qsub man page for the list of available options).


Independent Jobs

An independent job is defined as follows (from http://www.mathworks.co.uk/help/distcomp/program-independent-jobs.html):


An Independent job is one whose tasks do not directly communicate with each other, that is, the tasks are independent of each other. The tasks do not need to run simultaneously, and a worker might run several tasks of the same job in succession. Typically, all tasks perform the same or similar functions on different data sets in an embarrassingly parallel configuration.

Independent jobs are created using the Matlab createJob() function.


An independent job example:

 /cm/shared/examples/matlab/distributed/independent

Note: Matlab will submit the job to SGE without the need to write a submission script:

$ matlab -nodisplay < independent.m 
Communicating Jobs

A communicating job is defined as follows (from http://www.mathworks.co.uk/help/distcomp/introduction.html):

Communicating jobs are those in which the workers can communicate with each other during the evaluation of their tasks. A communicating job consists of only a single task that runs simultaneously on several workers, usually with different data. More specifically, the task is duplicated on each worker, so each worker can perform the task on a different set of data, or on a particular segment of a large data set. The workers can communicate with each other as each executes its task. The function that the task runs can take advantage of a worker's awareness of how many workers are running the job, which worker this is among those running the job, and the features that allow workers to communicate with each other.

Communicating jobs are required for:

  • parfor loops which allow multiple loop iterations to be executed in parallel;
  • spmd blocks which run a single program on multiple data - i.e. the same program runs on all workers with behaviour determined by the varying data on each worker (see here).

Communicating jobs are created using the Matlab createCommunicatingJob() function and can have a Type of either pool or spmd:

  • a pool job runs the supplied task on one worker and uses the remaining workers as a pool to execute parfor loops, spmd blocks etc., the total number of workers available for parallel code is therefore one less than the total number of workers;
  • a spmd job runs the supplied task on all the workers, with no task fundamentally in control - effectively, an spmd job acts as if the entire task is within an spmd block.

Communication beween spmd workers (whether in an spmd job or spmd block) occurs using the lab* functions (see Matlab help). Control of spmd workers is usually exerted by message passing and testing data values (e.g. using the worker with labindex of 1 to control other workers).

An independent job example:

 /cm/shared/examples/matlab/distributed/communication


Note: Matlab will submit the job to SGE without the need to write a submission script:

$ matlab -nodisplay < communication.m


Non-blocking jobs

The examples in both the communicating and independent jobs sections submit the job then wait (block) until the job is complete, subsequently extracting the results and deleting the job, i.e.


cluster = parcluster('Cosine');
ijob = createJob(cluster);
....
submit(ijob);
wait(job, 'finished');  %Wait for the job to finish
results = getAllOutputArguments(ijob); %retrieve results
...
destroy(job); %destroy the job

In some situations, this might not be desired - e.g. where client is not allowed to run for long times on the submit host. In such cases a non-blocking submit script should be used instead. The only difference to the communicating and independent scrips defined earlier is that a non-blocking job doesn't have the wait and destroy calls.


A non-blocking independent submit script:

/cm/shared/examples/matlab/distributed/independent/independent_noblock.m 

A non-blocking communicating submit script:

/cm/shared/examples/matlab/distributed/communication/communication_noblock.m 


Once the job has been completed, the results can be fetched programmatically:

cluster = parcluster('Cosine');
job = cluster.findJob('ID',1);
job_output = fetchOutputs(job);

 The ID used in cluster.findJob('ID', ...) above is the internal Matlab job ID as displayed at the end of the example non-blocking submit scripts, not the SGE job ID.

Once you have finished with it you can delete it using

destroy(job);


How do I use GPU/CUDA Resources?

The node cosine004 has two NVIDIA Tesla K40m GPU Computing Accelerators. Each card provides 2880 cores and 12GB of RAM. Each card has been set to exclusive mode, meaning only one process can access the gpu at a time.

The device names of these cards are /dev/nvidia0 and /dev/nvidia1. 

A dedicated queue, gpu.q has been created for these resources. 

For interactive use, use qlogin and specify the queue:

 qlogin -q gpu.q

For batch use, use qsub in the standard fashion, but specify the queue:

 qsub -q gpu.q submit.sh


CUDA 7.5 tools are installed, but must be loaded with the modules system, typically you will include the toolkit and the gdk

module load cuda75/toolkit/7.5.18
module load cuda75/gdk/352.79

NOTE: when comping software with nvcc, there is a module conflict with gcc/5.1.0, remove this module to use the system gcc 4.8.5 

module unload gcc/5.1.0

CUDA Example

A simple CUDA example can be found in the directory: /cm/shared/examples/cuda

I can't connect to the cluster from off campus

The Cosine cluster is protected by a firewall which blocks access from off campus. Users need to establish a VPN connection or first ssh into a campus server before connecting to the submit node.

We recommend connecting using the VPN. However, if you cannot use the OSU VPN but are able to remote into a campus PC, you can SSH from the campus PC to access the cluster.
If you prefer to work locally when submitting jobs and accessing the cluster, you can also set up SSH multi-hopping.


I get font errors running qmon, how do I fix it?

If you run into an issue where:

[root@cluster-submit ~]# qmon
Warning: Cannot convert string "-adobe-helvetica-medium-r-*--14-*-*-*-p-*-*-*" to type FontStruct
Warning: Cannot convert string "-adobe-helvetica-bold-r-*--14-*-*-*-p-*-*-*" to type FontStruct
Warning: Cannot convert string "-adobe-helvetica-medium-r-*--20-*-*-*-p-*-*-*" to type FontStruct
Warning: Cannot convert string "-adobe-helvetica-medium-r-*--12-*-*-*-p-*-*-*" to type FontStruct
Warning: Cannot convert string "-adobe-helvetica-medium-r-*--24-*-*-*-p-*-*-*" to type FontStruct
Warning: Cannot convert string "-adobe-courier-medium-r-*--14-*-*-*-m-*-*-*" to type FontStruct
Warning: Cannot convert string "-adobe-courier-bold-r-*--14-*-*-*-m-*-*-*" to type FontStruct
Warning: Cannot convert string "-adobe-courier-medium-r-*--12-*-*-*-m-*-*-*" to type FontStruct
Warning: Cannot convert string "-adobe-helvetica-medium-r-*--10-*-*-*-p-*-*-*" to type FontStruct
X Error of failed request: BadName (named color or font does not exist)
Major opcode of failed request: 45 (X_OpenFont)
Serial number of failed request: 525
Current serial number in output stream: 536

Appears when attempting to run qmon, then you will need to install a package on your machine.

For machines running Ubuntu:

apt-get install xfstt
service xfstt start
apt-get install xfonts-75dpi
xset +fp /usr/share/fonts/X11/75dpi
xset fp rehash

What are the specs of the cluster?


HARDWARE QUEUE ASSIGNMENT
NODE CPU CORES RAM (GB) Network all.q di.q finch.q hendrix-gpu.q sun-gpu.q gpu.q lazzati.q schneider.q test.q
TOTALS:   1064 3712   416 144 24 2 1 2 480 48 24
cosine001 E5-2620 v3 @ 2.40GHz 24 64 1 Gbps 12       1       24
cosine002 E5-2680 v3 @ 2.50GHz 48 256 1 Gbps 48                
cosine003 E5-2697 v2 @ 2.70GHz 48 256 1 Gbps 48                
cosine004 E5-2620 v4 @ 2.10GHz 32 64 1 Gbps 28     2   2      
cosine005 E5-2695 v4 @ 2.10GHz 72 256 1 Gbps 72                
cosine006 E5-2620 v4 @ 2.10GHz 16 64 1 Gbps 16                
cosine007 E5-2620 v4 @ 2.10GHz 16 64 1 Gbps 16                
cosine008 E5-2620 v4 @ 2.10GHz 16 64 1 Gbps 16                
cosine009 Silver 4216 CPU @ 2.10GHz 64 96 1 Gbps 64                
cosine010 Silver 4216 CPU @ 2.10GHz 64 96 1 Gbps 64                
di001 E5-2680 v3 @ 2.50GHz 48 256 1 Gbps   48              
di002 E5-2680 v3 @ 2.50GHz 48 256 1 Gbps   48              
di003 E5-2680 v3 @ 2.50GHz 48 256 1 Gbps   48              
finch001 E5-2630 v2 @ 2.60GHz 24 128 1 Gbps 12   24            
lazzati001 E5-2695 v3 @ 2.30GHz 48 128 FDR             56    
lazzati002 E5-2695 v3 @ 2.30GHz 48 128 FDR             56    
lazzati003 E5-2695 v3 @ 2.30GHz 48 128 FDR             56    
lazzati004 E5-2695 v3 @ 2.30GHz 48 128 FDR             56    
lazzati005 Gold 5218 CPU @ 2.30GHz 64 192 FDR             64    
lazzati006 Gold 5218 CPU @ 2.30GHz 64 192 FDR             64    
lazzati007 Gold 5218 CPU @ 2.30GHz 64 192 FDR             64    
lazzati008 Gold 5218 CPU @ 2.30GHz 64 192 FDR             64    
schneider001 E5-2620 @ 2.00 GHz 24 128 1 Gbps 24             24  
schneider002 E5-2630 v2 @ 2.60 GHz 24 128 1 Gbps 24             24  
TOTALS:   1064 3712   416 144 24 2 1 2 480 48 24


- Where cores are allocated to more than one queue the investor queues take precedence during scheduling.

GPU Resources

cosine004: gpu.q 2 NVIDIA Tesla K40m GPUs 2880 cores and 12GB of RAM.

cosine004: hendrix-gpu.q 2 NVIDIA Tesla K40c GPUs 2880 cores and 12GB of RAM.

cosine001: sun-gpu.q 1 NVIDIA Tesla K40m GPUs 2880 cores and 12GB of RAM.


I am receiving an error: /lib64/libstdc++.so.6: version `GLIBCXX_3.X.XX' not found

If this error occurs, you need to load an a newer version of gcc that has an updated libstdc++so.6 library. In your submit script, add the following lines to switch from gcc 5.1.0 to 9.2.0

module unload gcc/5.1.0
module load gcc/9.2.0

VPN

How Do I Connect to VPN for Off-Campus Use?

How do I connect to VPN for off-campus use?


VPN is a program that you can use in order to access the OSU network from home, just as if you were on-campus.

Please refer to our setup guides here: https://oregonstate.teamdynamix.com/TDClient/KB/?CategoryID=6889.

Web Cluster

Why Do I Get an Invalid Certificate When Logging In

We have moved our web structure to a more robust environment. In doing so all authenticated users on Drupal will be on the Secure port which requires a Certificate for each site. If the site is of the form oregonstate.edu we can get a Cert for free and you will not get a warning.

If it is not of that form there are two options, first is we create one but this will give the warning. Secondly is to purchase one for that site name.

Why Are my Edits not Showing Up When I'm not Logged In

With the new system we cache web pages, this way the site is more responsive.  The downside is some times the cache doesn't know that the pages changed and it will still send out the old page.  To request the new page hold down the Shift key and click refresh (pres F5 on the keboard) and this will get the most up-to-date page.

Web Services

How can I Post my own Web Page

Hosting a personal web page


If you place files in your Z: drive under the public_html directory, those files will be available on the internet at: 

https://sites.science.oregonstate.edu/~<username>

Where USERNAME is your science username. Please note the ~ before the USERNAME.

If public_html directory does not exist in your Z: drive: Create a new folder— Right click and go to New , then Folder . Name the new folder public_html .  Remember, your webpage must be named index.html for the page to show up automatically.

http://www.webmonkey.com/ is a good resource for how to make webpages.

If using SFTP to update your webpage, please connect to <shell.cosine.oregonstate.edu> with your ONID credentials.

Can Cosine Help Manage Department Web Site Content

Will Cosine help maintain department web site content?


The Cosine Helpdesk will provide secondary support for maintaining content on departmental web sites. However, this is an "as-time-allows" service, and requesters should have the expectation that requests may take weeks to fulfill, depending on the nature of the request and the current Helpdesk workload. Departments would be best served by having a competent individual in the department trained to maintain web site content, and using Helpdesk for this task only as absolutely necessary.

Requests should be submitted through the Helpdesk ticketing system (send a descriptive Email to helpdesk@science.oregonstate.edu) and Helpdesk staff will work on requests as time permits.

Windows

How do I Look up my IP Address

Determine a Computer's IP Address


For Windows 7 & 8.1:

Press and hold the Windows key + R

Type "cmd" (1) into the search field and select 'OK' (2) to open the command prompt.

Within the command prompt. Type "ipconfig /all", then hit Enter.

Look for "Ethernet adapter Local Area Connection." ("Ethernet adapter Ethernet0" in this case). Under that category look for "IPv4 Address." If your "IPv4 Address" starts with "128.193.XXX.XXX" and you are located on campus, then the IP is valid.

If the "IPv4 Address" starts with a "169.XXX.XXX.XXX" that means the computer defaulted to an IP address that is invalid.


If your “IP Address” starts with “169.” this means your computer has defaulted to an invalid IP address.

  1. Type “ipconfig /release”, then Enter
  2. Then type “ipconfig /renew”, then Enter (this can take a few minutes)

This prompts your computer to request a new IP from the server 

Type “ipconfig /all”, then Enter to see if your IP address has refreshed to a valid campus IP (i.e. starts with “128.193”) 

If this does not work, restarting your computer may fix the problem

How to Open a Command Prompt in Windows

Opening a Command Prompt


For Windows:

Step 1: Press and hold the 'Windows + R' keys.

Step 2: Enter "cmd" (1)  into the open field then select "OK" (2):

Command Prompt should open:


How are Automatic Updates Configured

Automatic Updates


Critical security patches for the Windows operating system are deployed through a system called Automatic Updates.  The updates usually patch a hole in the OS which would otherwise allow a computer to be compromised.  These patches are vital for a secure network and environment.

All computers on the SCIENCE domain have the same policy on how they check for updates.

The domain policy for automatic updates works like this:

Every 8 hours the client computer checks our update server for new updates.  If there are new updates it will download them and prompt you to install them.  This comes in the form of a popup notification like this:

From here you can install the updates manually, and if required, restart the computer.

If you do not install the updates manually, then the computer will install the update at 3:00 am every night and if no one is logged on, it will restart if required.

If the computer is logged on, it will prompt you if you wish to restart. If you choose [NO] it will prompt you again every 30 minutes until the computer is restarted.

If the computer is turned off at 3:00 am and there are updates to install then 5 minutes after the system starts up again the updates will be installed, and you will be prompted to restart the computer.

It is recommended to install updates as soon as possible and to restart the computer if required.

How do I find my Windows Computer Name and Version

Computer Name

In Windows 10 Right click the start menu which will look like this:
 
Then choose "System":

Find the field at the bottom called Device Name:

In Windows 7, Click on Start then Right Click on "Computer" and select Properties
Windows 7/Vista Start
You will find a Field "Computer name, domain, and workgroup settings" look for Full Computer Name.
7/Vista Peroperties

How do I Clear Temporary Internet Files / Cache

Clear Internet Cache

In Google Chrome + New Edge:

Step 1: While in Chrome or the new Edge, press Ctrl + Shift + Del, this should bring up the 'Clear browsing data' prompt.

Step 2: Select the time range for which you'd like to delete data for (1), and then select 'Clear data / Clear now' (2):

Chrome settings


In Firefox:

Step 1: While in Firefox, open the hamburger menu on the top right and select 'options':

Firefox 1


Step 2: Select 'Privacy & Security':

Firefox 2


Step 3: Scroll down until you find the 'History' section. Select "Clear History...':

Firefox 3


 Step 4: Select the time range for which you'd like to delete data for (1), and then select 'OK' (2):

Firefox 4


Wireless

How to Connect to the OSU Public Wireless Network

What is OSU Access?

OSU_Access is the unsecured campus wireless network. Anybody with an ONID account or a Conference Login can connect.

How do I connect?

You can connect to OSU Access using your laptop's wireless connection. If it is set to automatically connect, it may ask you if you really want to connect to it. You may also have to select it from the list of wireless networks, and it may ask you if you really want to connect here as well. In either case select Ok, or Connect.

When you open your browser, you should get a sign-in/registration page. You can choose to either sign in, which is just a temporary 600 minute login, or you can register your computer's MAC address so that you don't have to sign in again. We strongly recommend that customers permanently register their machines.

For instructions on how to permanently register your machine, Click Here.

Where to Connect to the OSU Public Wireless Network

The OSU Public Wireless network is also called "Access" and it can be used in the following aeas according to this map.

How to Connect to OSU Secure Wireless Network - Windows 7

OSU's Wireless connection instructions for Eduroam.

OSU's Wireless connection instructions for OSU_Secure.

OSU's Wireless connection instructions for manual connection to Eduroam.

How to Connect to OSU Secure Wireless Network - UNIX/Linux

OSU's Wireless connection instructions for UNIX/Linux manual connection.

How to Connect to OSU Secure Wireless Network - Mac OS X

OSU's Wireless connection instructions for Eduroam.

OSU's Wireless connection instructions for OSU_Secure.

OSU's WIreless connection instructions for manual connection to Eduroam.

How to Connect to OSU Secure Wireless Netowrk - Windows 10

OSU's Wireless connection instructions for Eduroam.

OSU's Wireless connection instructions for OSU_Secure.

How to Forget/Remove Wireless Network

OSU's Wireless instructions for forgetting network - MacOSX

OSU's Wireless instructions for forgetting network - Windows 10

IS Status

  • IS Status Dashboard

Quick Links

  • Request Help
  • Self Help (FAQ)
  • IS Knowledge Base
  • OSU Online Services

form
Request Help

phone
541-737-5574

email
E-mail

walking man
Walk-Ins Welcome

Contact Info

CoSINe IT Services
Division of Arts and Sciences

Oregon State University
060 Strand Ag Hall
Corvallis, OR 97331

Contact Us
541-737-5574

Copyright ©2022 Oregon State University
Disclaimer
Login